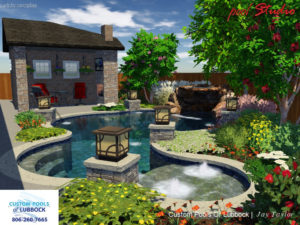
We believe no dream is too small or too ambitious for your backyard.
Call us today to schedule a FREE design consultation where you will work one-on-one with our pool designer. Our designer will learn about your vision, your backyard space, your budget, and your timeline. Then we will create a unique 3D plan to make your dream a reality. Our success in our custom pool designs can be measured by the growth of our company. Throughout the time we have been in business, we have steadily grown and it has been mostly through client referrals. We treat your project as though it were for one of our own backyards.
WE DON’T JUST DESIGN THE POOL OF YOUR DREAMS… WE MAKE IT A REALITY
Step 1: Project Design & Proposal
The first step in the construction process is an initial meeting between the client and one of our trained design technicians. During this meeting, our technician will find out what you, as the client, are looking for in the overall pool and landscape layout. All of our pools are designed specifically for each individual customer. The technician will then take a detailed survey of the proposed area to include home and lot dimensions, positioning, building setbacks, location of utilities and accessibility to the construction site. Within a few days, our design technician will have a fully prepared plan and proposed construction cost for the pool organized for you to review.
Step 2: Layout & Excavation
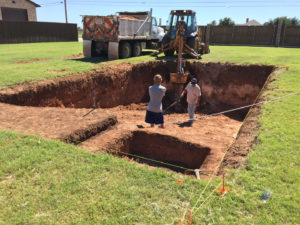
When the plans have been approved by you or your authorized representative and all necessary permits have been obtained, the construction process may begin. The pool is laid out using stakes and redwood forms. The form represents the outer edge of the pool shell. We ask that you or your representative be present at this phase for the purpose of coordination between our design and construction departments. It is extremely important that both the pool and mechanical equipment be located at this time. If your home is under construction, we will need to have access to both water and electricity at this time. The forms must not be disturbed, as they represent the exact elevation, location, size, shape and position of the finished pool.
The excavation process is now ready to begin. The earth from your pool is either hauled away or kept on site for backfilling as necessary for later phases of construction. This is one of the two “dirty and noisy” phases of construction. We attempt to keep the dust down to a minimum, but it will be dusty, and the heavy equipment is noisy. We suggest you keep all windows and doors closed and keep your children away from the site during this phase.
Step 3: Short Plumb, Steel, Electrical & Inspections
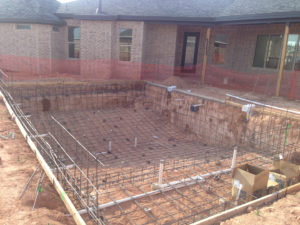
Steel: 3/8″ steel reinforcing bars are placed to strengthen the gunite shell. The steel is shaped to the pool’s design and extra steel is used at points of high stress. The reinforcing steel is securely tied in the place. The day of guniting, the bars are blocked up from the dirt so the entire “basket” will be surrounded by gunite when finished. The electrical contractor should then bond the steel shell. Stairs and benches in the shallow end do not have steel placed, they are solid gunite.
Electrical: This will be your first meeting with our licensed electricians. They will inspect your service panel and determine the exact distance to the mechanical location. They will also bond the steel structure and call in your 1st inspection. This is the time to talk about any future electrical, nightscaping, speakers, etc.
Inspections: Our construction office will notify both the building and electrical departments, if you are using our electrician, prior to gunite. We have placed the permit in a permit container and secured it near your home. Please make sure the building permit is still accessible for signing by these inspectors. If the container is not there, please notify us immediately.
Step 4: Gunite
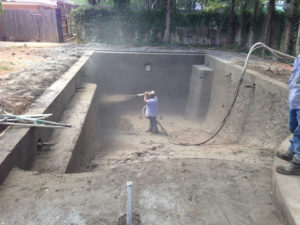
This is the major step in your construction project, one of the dirtiest and certainly the noisiest. There are many large trucks on-site the day of gunite. Be prepared for some commotion, and watch your children. It’s exciting to watch, but you will want to keep all nearby doors and windows closed throughout the guniting operation. It is during this phase that the stairs, benches, light niches, etc. will be set in place. Beginning the next day, you should we down the gunite shell two (2) times per day for seven (7) days to facilitate the curing process. Do not become alarmed if any water accumulates in the bottom of the pool. During these seven days, 85% of the eventual concrete cure takes place, and it is now possible to resume the construction process. Forms will be stripped, any necessary backfilling performed, and preliminary deck grading will take place.
Step 5: Pool Plumbing
Schedule 40 PVC pipe, which will be beneath the deck will be installed and extended to the mechanical equipment location. This includes lines such as the main drain, skimmer, hydro-therapy jets, automatic cleaner, waterfall and any other mechanical lines that may be included in your contract. All piping is pressure tested prior to gunite placement to insure against any leaks.
Step 6: Tile & Coping
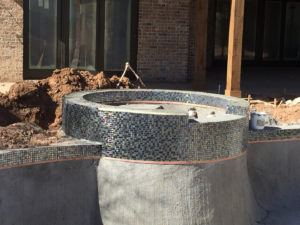
A 6″ band of frostproof ceramic tile is now applied to the top inside edge of your pool. This allows easy cleaning at the water line. If tile markers are to be placed on the stairs, they will be done day of plaster. Make sure water and electricity are available for the crew’s use.
If your pool is to be edged with coping, field stone or other, our stone mason now installs this finish. Otherwise, the cantilever edge of the deck provides the pool’s top finish.
Step 7: Deck Layout & Deck Pour
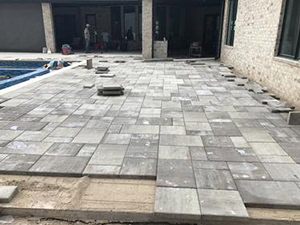
This is very important because the deck is the entertainment area around the pool. After the layout, take the time to be comfortable with the design. It is not uncommon to place chaise lounges or tables in the laid out area.
This process entails large concrete trucks down the access road. It is very important that all cars are cleared to allow access and that all children are kept out of the area. This is when the project really comes to life.
Depending on your choice of decking (plain, exposed aggregate, pavers or stamped) the steps may vary at this time. Exposed aggregate and stamped concrete are multi-day processes, so don’t be alarmed if your deck doesn’t look the right color after it is poured. The expansion joints are saw cut in the stamped pattern so you may see some hairline cracks, but the deck is reinforced with 3/8″ steel rebar.
Step 8: Pool Equipment
The mechanical components, including the filter system, time clock, automatic cleaner and heater (if ordered) are installed prior to plaster. If it is our electrician, we will notify him to insure all mechanical equipment is wired prior to plaster. If it is your electrician, you must inform the scheduling department both when his completion is scheduled and then when work is completed. Work relative to pool heating should also be completed now. Please note that natural gas and propane heaters require specific pipe sizes and gas pressure.
Step 9: Interior Finish
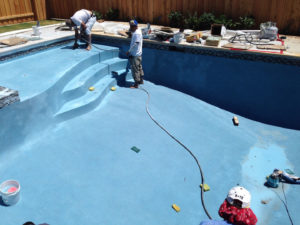
Before this final step is accomplished, it is essential that the pool and surrounding area be kept as clean as possible, and your fence or temporary fence has been installed to meet both local and state codes prior to filing the pool. Any projects which create dirt, dust, smoke or other mess, MUST be completed beforehand, or postponed until later. The sparkling cleanliness of a fine quality pool depends not only upon the ability of our craftsmen, but in keeping the pool as clean as possible until it is filled. We cannot be responsible for footprints or stains caused by dirt, fertilizer, dust and other debris from construction, landscape projects or winds.
Step 10: Filling Your Pool
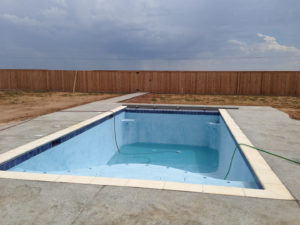
Once the filling operation has begun, NEVER turn off the water or move the hose from its original position until the level has risen to the middle of the tile band. This eliminates the possibility of a dirt ring, which is difficult to remove. When the pool is full, please turn off the water and inform us. Under normal conditions it is not necessary to call us until the pool is full. There is no harm in not having the filter on, for up to a week after filling. There is also no harm to the pool by swimming in the pool before the filter is started.
Step 11: Pool Start-Up
Soon after your pool is full, the mechanical equipment will be starte3d. This is the first and most basic instruction for operating your pool. For the next 7-10 days you will be:
- Testing and lowering your pH
- Brushing the pool
- Backwashing